Showing posts with label Tutorials. Show all posts

Thursday, June 16, 2016

Pop Up Birthday Card

Once again Dawn at Dawns Stamping Thoughts never ceases to amaze me with her wonderful tutorials! Here is a Birthday Pop up. ( don't mind the fingernail! It does actually lay flat!)The only thing I believe I need to tweak a little is the sliding part. Of course this was my first attempt at it. So I know that I will be doing it again!
I've had to put my crafting on hold for the day and continue again tomorrow! Stay tuned for more great ideas and cards!


 photo sig3_zpszbmgib3n.png

Tuesday, June 7, 2016

Gift bag punch board


Stampin Up's Big box of goodies finally arrived. Inside the box was the Gift Bag Punch Board. Something that I have been waiting on. So I took it right out and started punching out Gift Bags.
Here's a simple Large (5 x 12) gift bag that I made within 10 minutes. If you are looking for something last minute and quick this would be the tool to use!


Friday, June 3, 2016

Card in a Box

Christmas In June!
Hello! I have a wonderful little Christmas card in a box for you to check out today.
This was made using Cherry Cobbler, Gumball green and the DSP is from a Retired item called Trim the tree designer series stack.
This tutorial is from Buckey Inklings and you can follow her tutorial HERE.
A few corrections had to be made to the DSP that was used on the fold down sides. But it all worked out perfectly and now I have my very first Christmas Card in a box! This card does fit into a standard A2 envelope, so no worries there!
I hope you enjoy her tutorial...
Happy Stampin!


Friday, January 2, 2015

Stampin Up UK Secret Closure Gift Treat Soap Box

One of my favorite Demonstrators is Pootles in the UK. Her videos are so easy to follow. Here is one for a Secret closure gift box. It also holds 3x3 cards. What a great gift idea. I'm always looking for easy gifts to give out. 


Sunday, April 27, 2014

Sweet Sorbet Tri Fold Card

Sweet Sorbet Tri Fold card using 8 1/2 x 11 Cardstock instead of 12 x 12.
I found numerous tutorials on 12 x 12 cardstock but couldn't locate dimensions for a Tri fold card using 8 1/2 x 11 cardstock.
I finally figured it out a few hours later and the results are in.
It turned out beautiful.
The tutorial for the 8 1/2 x 11 cardstock Tri fold card are down below.


Tri Fold Card using 8 1/2 x 11 Cardstock
TUTORIAL
 
Cut Cardstock to 5 1/2 x 11
Score long side at 1 3/4 , 3 1/2, 7, 8 3/4
Using your Stampin up trimmer long side measure up 1 1/2 and cut from the 1 3/4 score line to the 8 3/4 score line .
Measure up 3 1/2 and cut from the 1 3/4 score line to the 8 3/4 score line
Mountain and Valley folds.


Monday, April 7, 2014

DSP Sweet Sorbet Treat Box

DSP Sweet Sorbet is one of my top picks for Designer Paper. I made sure during SAB that I ordered a few packs of it. Here is another Easter Treat Box made by a video tutorial you can find here. I have made quite a few already and plan on handing them out to coworkers for Easter. Who doesn't love a little chocolate?
Thanks to Sam Donald @ Poodles for sharing this video.


Sunday, February 23, 2014

How to make flowers using SU punches


Here I used two Stampin Up punches to make flowers.


 I used The Bird Punch and Blossom Flowers XL.
You Can follow the pictures and see how easy it really is to do.


Using your choice of CS, Punch out the top left pedal and the middle small one.

 
Using the Bird Punch, punch out two of the leaf stems
 
 
Now take the Large pedal that you punched out and stick it part way in as shown, try not to get the pedal into the one next to it, or you will cut out a notch on the side.


Take both pieces and put them together as shown (adhere with Mono adhesive) and snip of the bottom part of the pedal.


Take both stems and cut off
one of the stems as shown.


Adhere the stems, putting the
stem that was cut under the
second stem as shown.


Using your Mono adhesive attach the leaves to your flower and JOILA! you have your own flower!.


Sunday, November 10, 2013

Oval punch Christmas bows

A quick post with a tutorial to go with it.I found this really quick and easy tutorial on how to make bows using the Oval Punch.

Supplies are : DSP of your choice, oval punch, glue dots, square punch, scissors and ribbon about 1 1/2 in.

Punch out 4 ovals, using the square punch or scissors, notch the ends of two.

Using glue dots fold the other two ovals in half adhering with the glue dots.

Take the two bottom ovals and attach them
Together with a glue dot.

Now take the folded halves and attach them to the top.

Take the ribbon and wrap it around the middle and adhere in the back.

There you have it, a bow made by you!
Enjoy!

Tube sock snowman

Good Sunday morning, I was looking around some of the things to do for christmas and on my Facebook page was this cute snowman idea made from tube sucks..I wanted to share it with everyone, this is definitely a project you can do with the kids.


1. Cut a tube sock in half (at the heel) Save the bottom half of the sock for later....
2. Fasten the end of the sock with a rubber band.
3. Stuff the bottom half of the sock with your choice of cotton or rice. (rice will keep him sturdy), and fasten with a rubber band.
4. Stuff the top portion for the head and fasten with a rubber band.
5. (For the hat) flip the open end of the sock as if you were going to pair the socks and place it on the head of the snowman.
6. Use an old strip of fabric for a scarf and decorate as desired. You can use hot glue to attach eyes, nose and buttons


Tuesday, July 9, 2013

A Small Gift box idea

This is a good idea for a small gift box.
This comes from Split Coast Stampers you can find the
tutorial HERE
I'm going to be making quite a few of these for the 30 women I work with.lol


Friday, June 14, 2013

How to Design a button

A Quick tutorial on how to Design a Button, you can then click HERE that will take you to "Making your own Grab my button"
 
 
1. Open Picmonkey and go to Edit a Photo
   Pick any photo, you can resize and crop it in picmonkey
 
2. On the left hand side click on Overlays and click Geometric


3. Stretch out the rectangular till it fills your hole picture, then click in your color palette to make it white (top left corner). 
 
4. In the Panel on the Left Click on the Top "Basic Edits" and click on Resize
 
 
5. Remove the check mark in Keep Proportions, then resize it to 900x900
this will give us a good square to start making a button.


6.  Now Use whatever you want to design your button.
One TIP: Use a DARK color so the name of your Blog stands out, the button will be small so it will be hard to read.
 
7. Finished?....Now Click on Resize again and resize it to 125x125


8. Click on MERGE and then SAVE


9. It will be on PIERCE , which is good. Now Click SAVE and save it to your computer.


       10. LAST STEP- Upload it to Photobucket and go to the Directions for making a GRAB MY BUTTON


Wednesday, June 12, 2013

Making your own "Grab My Button"

You've seen them, I've seen them.. Those cute little side buttons where you can grab the code and add a button to the side of your Blog. I searched the internet for the Tutorial on how to do it, everytime I did it my picture would come up but no code!.How frustrating!!..lol
I finally came across a Website that actually does the whole thing for you!..How easy is that!.
If you're like me , sitting and figuring out codes and html is just not what your evening had in store..
My Button and Grab box is to your Right..Feel free to grab it! (hehehe)
 

Now to make your own, the only TWO things you need to do is
1. Design your Button Image and upload it to photobucket
2. Go to this Website and enter all your information..in just a few easy steps!
Very Easy!!..
Here's that website :
http://www.mycoolrealm.com/sandbox/gbgen/

Good Luck!
 

Saturday, June 1, 2013

Post it note Easel card

This was a very fast project to make .
Very simple ...
The fun part is it folds down so you can send it as a card and when opened it folds up to a post it note easel card ..


Supplies and Dimensions
 
Supplies: DSP, Bashful Blue CS, frame Punch, Oval Punch( the point on the leaves were hand cut)
Fun Flowers Bigz, Designer Buttons, Bashful Blue ink
 
Easel Card base : 4 1/4 x 11
Score at 2 3/4 and 5 1/2
 
Top (which rests against the easel part) 4 1/4 x 5 1/2
 
Mat (flowered DSP) 4 1/8 x 5 3/8
 
Pen/Pencil Holder : 1 1/2 x 2
Score at 1/2", 1", 1 1/2", 2"
Fold into Triangle and adhere
Tombo Adhesive and Glue
Post it note pad


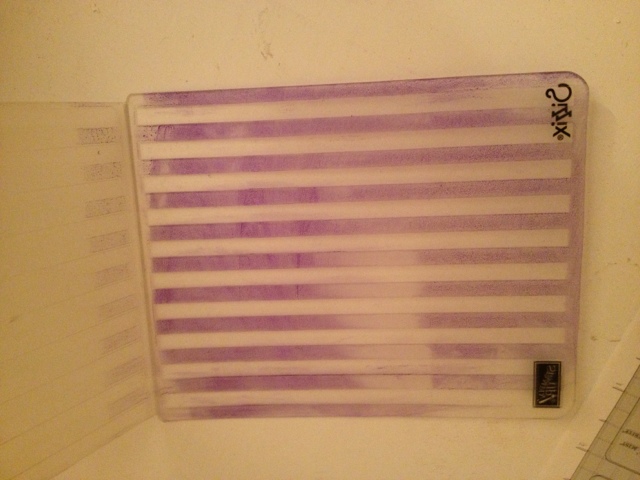
Using an Embossing Folder to Stamp

I actually learned this technique quite a few years ago from an Open House.
Checking out Stampin Up's Technique Tuesday I happened to see it..
 
Its very easy and makes a great color addition to your cards !
 
 
Thats all there is to it!...
Clean up is simple as well..Run it under water and wipe dry with a paper towel.
I use a little bit of soap and water and wash it off..


Thursday, May 30, 2013

Easel Post it note Holder Tutorial


CREDIT: This was originally done by Jen at Jennerator74
You can click on the Right corner and view it full screen


Friday, May 24, 2013

Fancy fold pop out card

Happy Friday!
I found this Paper fold in a tutorial and really liked it..and when I like the look I just have to try it out!.
This was very easy!..I am a little stuck on the outside of the card, but the inside of it was a breeze!. I think I'll use other colors next time..I just happened to have some Black polka dot DSP laying around so I used it up!.
If you want the tutorial you can click here and try it out yourself!


Sunday, May 19, 2013

Potpourri envelope

I made this years ago at an open house as happened to run across it while cleaning out that mess of a craft room ( which is progressing lol ) , I thought this was a great idea and a simple "sweet smell" of a gift . I had made two and stuck one in the kitchen and our bedroom. Here's how to make one of your own.


Supplies: Standard Size Envelope (sealed), Paper Crimper (stampin up used to carry this, but you can use any embossing folder of your liking),Stamp Set of your choice (I used Printed Petals item # 120444, which you can purchase from me here , Ink Pads - Wisteria Wonder,Orchid Opulance (retired) and Lovely Lilac (retired).
Tag: Ovals Punch & Scallop Oval Punch
Ribbon


1. Take your envelope and seal the back of it, Measure about 3" down and cut straight across.
You'll then have two pieces. Top and Bottom.


2. Slide the Top part over the bottom part till it doesnt go any further.

 
3. Take your Slot Punch and punch a hole on both sides of the envelope.


Now you have two pieces with slots that will match up. Take them apart and lets move on to the next step.


4. Using your Stamp set of your choice, stamp the bottom part of your envelope.


5. Now take the top part of your envelope, using a Embossing folder (I used Stripes).
And your Desired Ink color, and wipe the ink pad on your embossing folder till its covered.
Like this below:


6. Carefully put the top of the envelope (sealed side down) and close the embossing folder.
Now run it through your Big shot.
You'll get something like this:


7. Now using your Paper Crimper run the bottom half through it. Or if you are using an embossing folder you can run that through your Big Shot.
It should look something like this depending on what you use.


8. Taking the bottom part, fill it with Potpourri. Once finished, slide the top part over the bottom. (It will be a little snug, but keep working at it, it will go in.
Once the two pieces are together, take a piece of ribbon and put it through the slots and tie it. This will hold both pieces together. Now add a Tag and sentiment of your liking and Joilaaa!..
 
You just made a Nice Smelling Potpourri Envelope you can place anywhere or give as a gift !